
Visits: 5647
Hmailserver on Windows Server with Roundcube Webmail , Easy Install
HmailServer Email Server on Windows combined with Roundcube is the best open source packages installed on a Windows. Spamassassin spam filter has been configured to work “right out of the box”. In its basic form , Installing these by yourself, is really easy to install. With MySql Database support and Spamassassin, it is a bit more complicated. We suggest that you go with a Pre-Installed AMI from AWS in order to avoid installation glitches. Installing RoundCube Full Mail Server with Hmail is really easy. It is unlikely that you will get stuck, since this Image is professionally installed and used by many organizations. If you do need it, Support is included.
For easy install Click the link below:
We hope that what’s below will someday get rejuvinated, but in the meantime install this Complete Email Server with Webmail
Try Postfix Email Server, until this installation returns. The Best way to have a completely secure Postfix server is to install our simple to install EC2 including Roundcube WebMail. Check it out AWS Marketplace: Mail Server on Linux Postfix using MySQL for tons of users (amazon.com)
For greater security you might be interested in HmailServer alone without a web server.
RoundCube with HmailServer mail Server on Windows 2012 for mail@yourdomain. Add as many addresses as you like. Pre-installed EC2 Cloud Server. Hmail Server on Windows offers you an easy Email Server solution to your need for email@Yourdomain. This Cloud Server includes RoundcubeWebmail so that you can check email anywhere and from any device.
Access Instructions are below
Try Out this pre-installed AWS AMI Image at the AWS Marketplace
Email Server from Floating Cloud – Hmailserver On Windows
- Add as many Email Addresses as you need and as much IMAP storage
- Uses MySQL database for speed and portability .
- Floating Cloud Technical Support will help with anything associated with the server Security Advice and any glitches that hopefully won’t happen.

Flaoting Cloud Email Server on Windows includes Hmail Server using Mysql Database for mail@yourdomain and Floating Cloud Technical Support. You can add as many addresses as you please, Mailbox charges are avoided, this gives you independence.
If you can manage your Windows PC, you can manage this email server. This Windows Server with popular open source software is great for those who want a server that can be managed by any of the millions of Windows System Administrators around the world. Files can be manipulated through the Windows File Manager and edited in the standard Windows Text Editor. The Graphical Windows interface of the Hmailserver Administration makes it a cinch to manage users, Your Mail domain will be up and running very quickly.
We Float The Chaos Out of Your Cloud! By using Floating Cloud servers you will benefit from our years of experience in System administration. We have built this server especially for the needs of small and SOHO businesses. Since this server might be used for development you might want to kill it and restart, That’s OK. After 3 months simply email us at support@floatingcloud.io
To Install this image go to
Access Instructions – How to configure your HmailServer
Release Notes Below
Thank you for installing – email support@floatingcloud.io with any questions
- Before Starting to set up the Floating Cloud Email Server you should setup your DNS,
http://docs.aws.amazon.com/Route53/latest/DeveloperGuide/getting-started.html
If you are purchasing a domain via AMazon Route 53 it will configure some things, However, you will still need to add an A record which points to the IP address of your Floating Cloud EC2 Server. The IP address is found in the EC2 section of the AWS panel. In order to receive email you must configure an MX record.
Thank you for installing – email support@floatingcloud.io with any questions
- You can use the Floating Cloud HmailServer to send email right after adding a username. However you can only receive email after setting up the DNS and the doman within HmailServer.
- Before Starting to set up the Floating Cloud Email Server you should setup your DNS,
http://docs.aws.amazon.com/Route53/latest/DeveloperGuide/getting-started.html
If you are purchasing a domain via AMazon Route 53 it will configure some things, However, you will still need to add an A record which points to the IP address of your Floating Cloud EC2 Server. The IP address is found in the EC2 section of the AWS panel. In order to receive email you must configure an MX record.
The A Record and MX Records must be setup correctly in order to receive any messages over the internet.If you get at all stuck please email us to support@floatingcloud.io
- You need to give your instance an elastic IP Address, so that it will always have the same IP address after stopping and re-starting.
To allocate an Elastic IP address for use in EC2-VPC using the console
- Open the Amazon EC2 console at https://console.aws.amazon.com/ec2/.
- In the navigation pane, choose Elastic IPs.
- Choose Allocate new address
- (VPC-only accounts) Choose Allocate, and close the confirmation screen.
To associate an Elastic IP address with an instance using the console
- Open the Amazon EC2 console at https://console.aws.amazon.com/ec2/.
- In the navigation pane, choose Elastic IPs.
- Select an Elastic IP address and choose Actions, Associate address.
- Select the instance from Instance and then choose Associate.
- To configure your DNS so that the internet knows that email can be delivered in your server, you need an A Record and an X record.
Setup DNS with AWS Route 53 from Scratch – Purchase Domain
We suggest having your DNS COMPLETLY setup before launching our Floating Cloud Server especially Mail and PhpList Servers.
http://float.i.ng/setup-mx-record-in-route-53-with-a-domain-that-you-registered-with-aws/
To do this you need to create and Elastic IP which will get attached to your Server Instance after it is launched. You need this for Domain Authority as t the IP address will not change if the server is turned off and back on.
We always prefer to use the AWS Route 53 DNS servers as these are both simple and integrated. They are also not limited in the ways that many other DNS services are. One very popular host won’t even let you point the DNS to another mail server. The instructions below show how to use Route 53 as the DNS.
IN these images and instruction I am registering and setting up a domain called charming.cloud Any links that you see with this domain or with instructions to open your server at http://YOURDOMAIN or the like must be replaced by your real domain name.
Sign in to console.aws.amazon.com/console/ with your AWS Username and Password, this might be different from your Amazon Login.

Under AWS Services select Route 53.
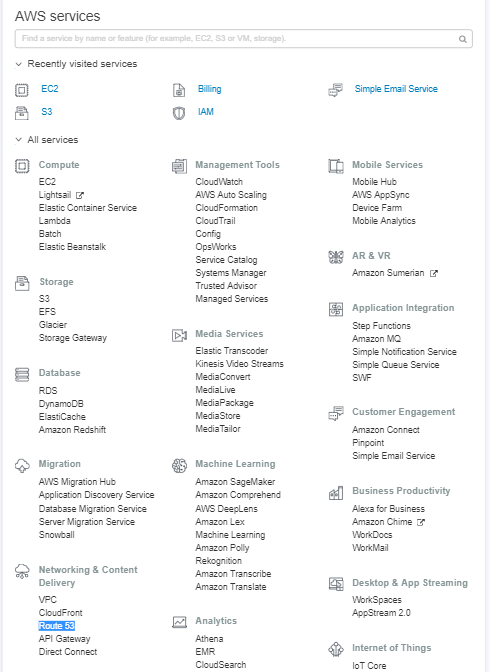
Click Domain Registration

Route 53 Domain Registration
Check to see the availability of your domain. AWS sells a huge assortment of domains. charges reasonble prices with no tricks for the second year. Like Godaddy might sell you a domain for a dollar then 50 for next year. You should always buy your domains from Amazon AWS Route 53.

Fill in contact details as required

Select your desired privacy setting

Press continue then agree to terms and complete purchase

After completeing the registration you need to wait some time, depending on which Top Level Domain you ordered.

So! this can take a few days. Put off launching your PhpList Free Trial until your DOMAIN and DNS are organized. But alas it took only 15 minutes.
You then need your DNS to have an A record to point to the IP address of the server. The A record is the domain or sub-domain that you plan to use for this server.
You then need to make an MX record point to that A record. This makes the Instance open to receive email from the rest of the Universe. You will receive bounces to bounce@YOURDOMAIN.com . Without the MX record set correctly your server might be blacklisted since it can’t process the bounces properly.
Be sure that you Allocate the Elastic IP in the region you intend to use for the PhpList Server on Windows.
Click in the lower left column Elastic Ips
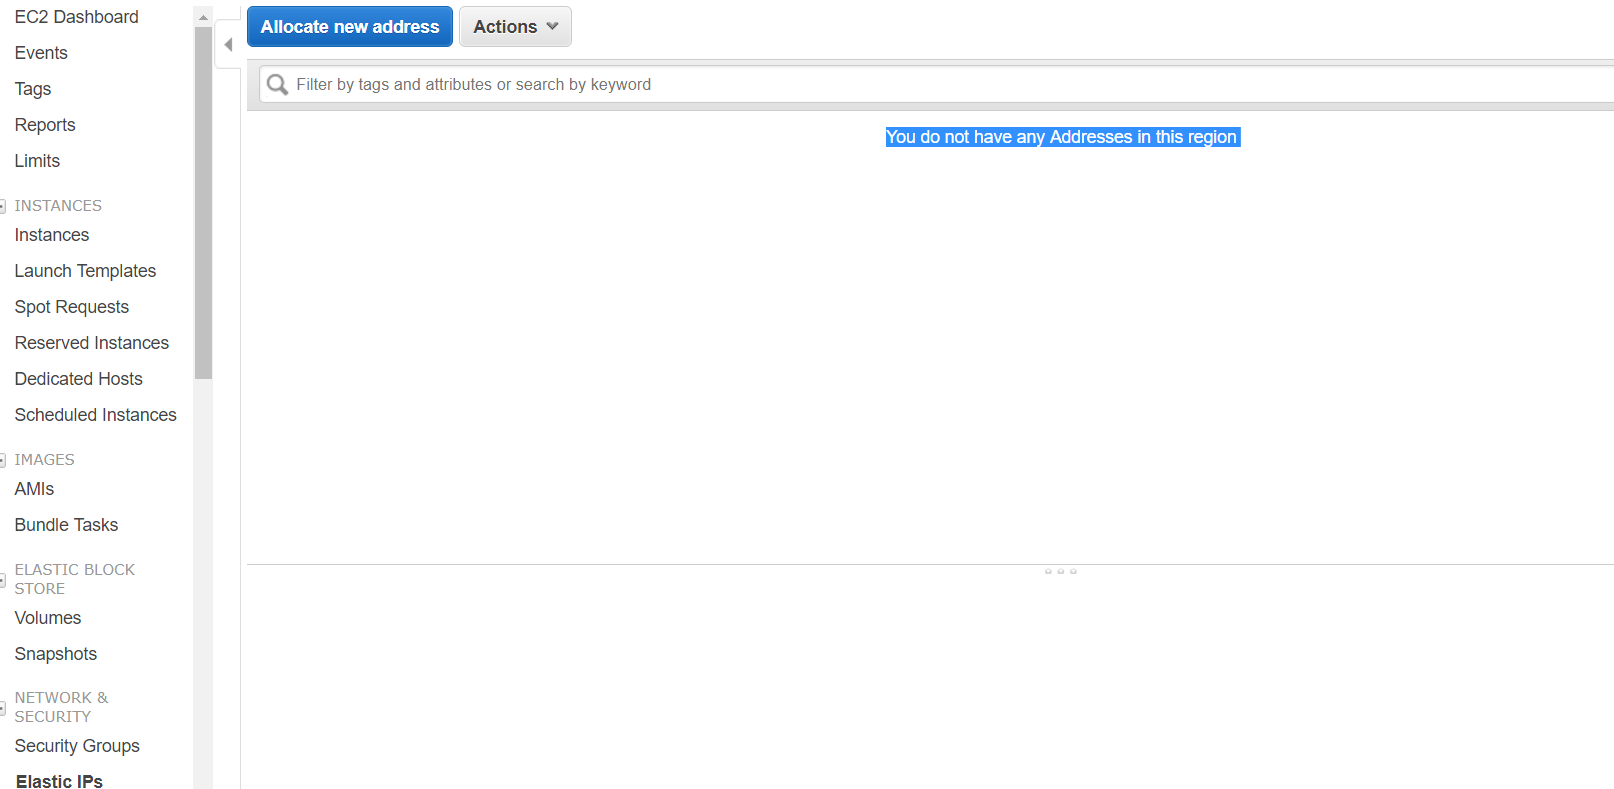
Then Allocate again,

Now copy the IP address into the Route 53 to create an A record for the domain we registered above.

Go back to Route 53 under services click your new domain from the list of domains in hosted zones.

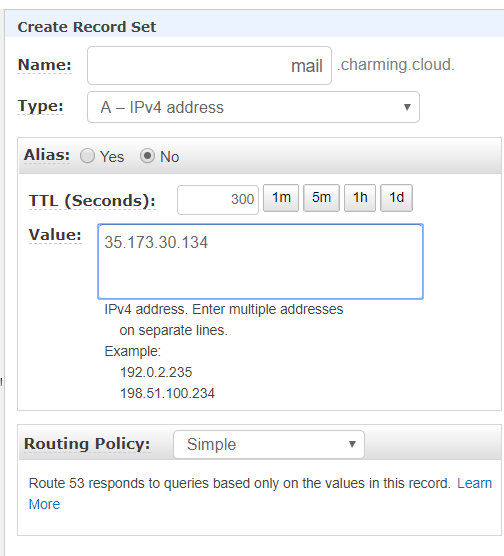
Now you will see a window like this. Select Create Record Set towards the top of the window.

Create an A record pointing towards your new IP address either with your domain name or a sub-domain, that the A record creates, then create an MX record that points to it. I really like my new domain name of charming.cloud and want the web address to go to my Floating Cloud WebSite. In order to get email to charming.cloud we will set the MX record of charming.cloud
The MX record tells the universe that a server named mail.charming.cloud will receive email to anyone@charming.cloud .
Click on your domain.
So if your mail server uses the same server as your Web server, you can use a single domain or subdomain.
In the right column next to Name: fill in the subdomain that you would like the server to be known as. You can use your top Level Domain if you plan to use the same IP address as your webserver. In other words, leave Name field blank if you are not using a subdomain. paste the IP address that you got from Elastic IP into Value. Then Press Create
Now create an MX record that points to your A record Fully Qualified domain name. IN our case they are different.
Again , Select Create Record Set, in the right column select MX record.

Now, next to Value put the number 10 followed by space then the Fully Qualified domain name used in the A record. Then Press Create.

Now you will see the records.

Although we haven’t yet launched the server instance , we have done a lot of the hard work needed to create your PhpList Server. Lets verify that the Internet knows what we did.
I like to use mxtoolbox

Here we see that the domain that we looked up charming.cloud has an MX record as we set up that points towards mail.charming.cloud . If you made changes to a DNS it takes time for them to propagate, this depends on TTL setting which is measured in seconds. If your TTL is really high, you might need to wait a day or 2 to see the changes.

Setup the DNS via Route 53 – Just the MX Record
If you are using a different DNS than Route 53, please drop us an email to help you out to support@floatingcloud.io
The MX record could the name of a different A record. So you could give your Instance, Elastic IP address, as mail.YOURDOMAIN.com while an existing A record points towards the Top Level Domain of YOURDOMAIN.com. But the examples below are for the same domain name as the name of the Mail Server.
Before Starting to set up the Floating Cloud Server you should setup your DNS,
http://docs.aws.amazon.com/Route53/latest/DeveloperGuide/getting-started.html
If you are purchasing a domain via AMazon Route 53 it will configure some things, However, you will still need to add an A record which points to the IP address of your Floating Cloud Small Business EC2 Server. The IP address is found in the EC2 section of the AWS panel. In order to receive email you must configure an MX record. As discussed above this IP address needs to be an Elastic IP Address, which means the IP address is set.

Ip Address is Blue in the image
- Here the The A Record points to testmail.charming.co.il

A Record in Route 53 DNS
The in order to get Email to @YOURDOMAIN.com write the name of MX record YOURDOMAIN.com and fill in the DNS form as:
10 mail.YOURDOMAIN.com
IN Route 53 click to create record and select MX
Fill in the blank form with:
10 your-domain-name-from-A-record

![]()
Settings should look similar to this when you finish
This is indeed confusing so please just email us, and we will help you.
If you are using another DNS service you must use their instructions to setup your web domain and MX record to receive email . Contact us for assistance at support@floatingcloud.io
Read more about MX Records
As Well as
It is much simpler if your publicDNS and Your-Domain-Name are the same, since the server needs these properly setup.
After Setting up the DNS you need to setup Hmail Server. This is fairly simple
- You need to login to the Windows Desktop of your new Floating Cloud Server in order to configure HmailServer.
To login to your server from Windows , right click on your instance ID, in the AWS Ec2 Panel, Get Password using your key file then download the Remote Desktop File and open it when it is downloaded.
If prompted to upgrade Windows, do so. We also suggest upgrading optional upgrades.
Setup Email@Yourdomain
In order to setup your Floating Cloud Server to receive email you need to first setup an MX record that points to the domain on
- You can use the Floating Cloud HmailServer to send email right after adding a username. However you can only receive email after setting up the DNS and the doman within HmailServer.
- Before Starting to set up the Floating Cloud Email Server you should setup your DNS,
http://docs.aws.amazon.com/Route53/latest/DeveloperGuide/getting-started.html
If you are purchasing a domain via AMazon Route 53 it will configure some things, However, you will still need to add an A record which points to the IP address of your Floating Cloud EC2 Server. The IP address is found in the EC2 section of the AWS panel. In order to receive email you must configure an MX record. - You need to login to the Windows Desktop of your new Floating Cloud Server in order to configure HmailServer.
login To Windows and Run from the Start Menu HmailServer administrator

Open the HmailServer , use blank Password and press OK.

Hmailserver wont receive email unless you set a domain until you configure your domain with DNS, MX, and elastic Ip Address and within Hmail itself. So you can only send some emails out of the new server instance but cannot receive.
- OPen Hmailserver Admin – Click OK – No password
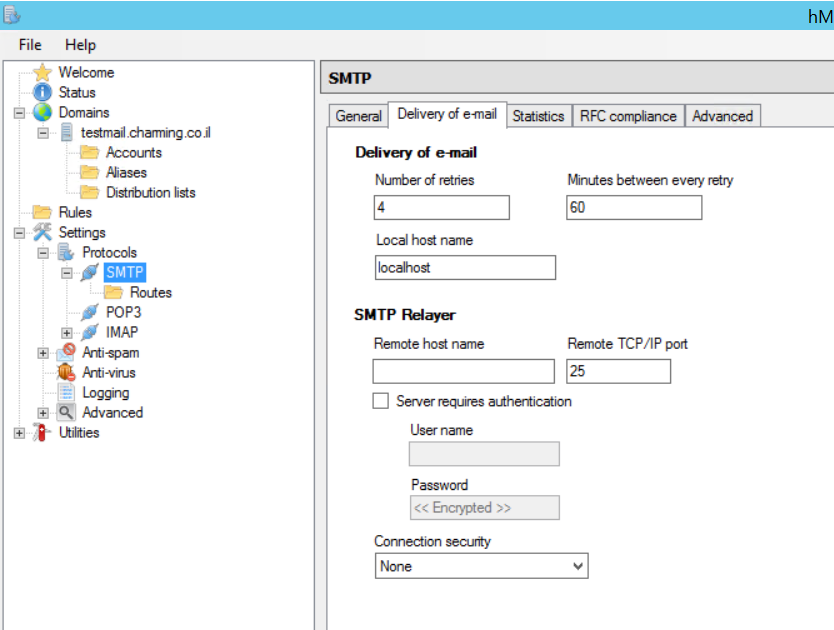
- Click on Domain in the left column and Change Localhost to your Domain Name that has the MX record set to point to it
- Press Save


- Click Settings – Protocols – SMTP – then click the Delivery of Email Tab under fill in your Domain Name in Local Host name that you are sending from, then press Save. Although HMAILServer requires this, you might not be able to send any emails as these are often blocked by Amazon. Instead you should set your email client, like Outlook, Thunderbird, etc to use Amazon SES.
- In the Hmailserver Administrator add Email Addresses
- Under Domain – Your Domain Name – Click Accounts,
- Press Add, on the right side
- Fill in, at least the email address, Password and Maximum size for Mailbox.

To check email use full email address, this is for your client settings like MS Outlook.
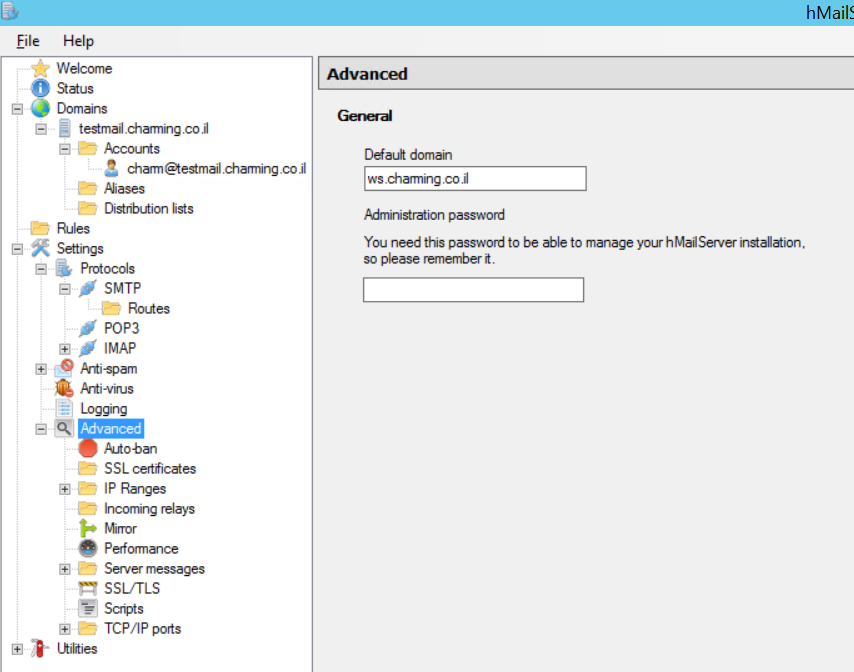
You Should Set a Password for the HMailServer Administrator
HmailServer Administrator password has been left blank you certainly add a secure password instead of blank
- Start hMailServer Administrator and log on.
- Go to Settings -> Advanced
- Enter the new Administration password and save the changes.
Check https://www.hmailserver.com/ for all of the documentation for Hmailserver
Hmailserver is very powerful , these instruction just get you going.
I suggest NOT using this server as SMTP. It isn’t setup to relay. We have found AWS SES service to be the best, To use SES in your client
Use port 587 or 465
IAM and SES will assign you an SMTP username and password
For security try starttls
Read our Blog Entry to assist with SES: http://float.i.ng/hmailserver-with-ses/
Send an email to support@floatingcloud.io if you have an issue setting up SES, it can be confusing. We won’t be able to assist in making your Floating Cloud Server do SMTP in a manner that the email won’t be blocked by spam filters.
Check https://www.hmailserver.com/ for all of the documentation for Hmailserver
Hmailserver is very powerful , these instruction just get you going.
You can setup your email client like Outlook or Thunderbird. Check https://www.hmailserver.com/ for instructions
Send an email to support@floatingcloud.io if you have an issue setting up SES, it can be confusing. We won’t be able to assist in making your Floating Cloud Small Business Server do SMTP in a manner that the email won’t be blocked by spam filters.
If you are using another DNS service you must use their instructions to setup your web domain and MX record to receive email . Contact us for assistance at support@floatingcloud.io
Use Diagnostics to verify that your settings are ok go into
Utilities —> Diagnostics
Fill in both fields with your Domain Name, then press start

The results should all be green, except for “Test Backup Directory” which can be red.

If you need to access the MySql Server
The MySql Password is set to the Instance ID . This can be found in the ec2 panel of AWS. An init script plants these passwords in the appropriate config files throughout the server. You can change it if you desire. So, use user root or charming and the password is the Instance ID.

Instance Id is Blue in the image
Error Connecting to your Server.
If you receive an Error “Connection to storage server failed.” You need to remove the localhost from the Autoban list. This happens while testing a new server, but it is VERY useful to prevent spammers from trying to hack your email server. In order to fix it go the admin panel in Hmailserver and select Avanced —> IP Ranges and remove your accountname@localhost.

You can check your email using Roundcube Webmail that is pre-installed in the Floating Cloud Small Business Server.
Goto
http://publicDNS/webmail
Put in the username@domainname and password added above. In other words you need to put the entire email address in to login.
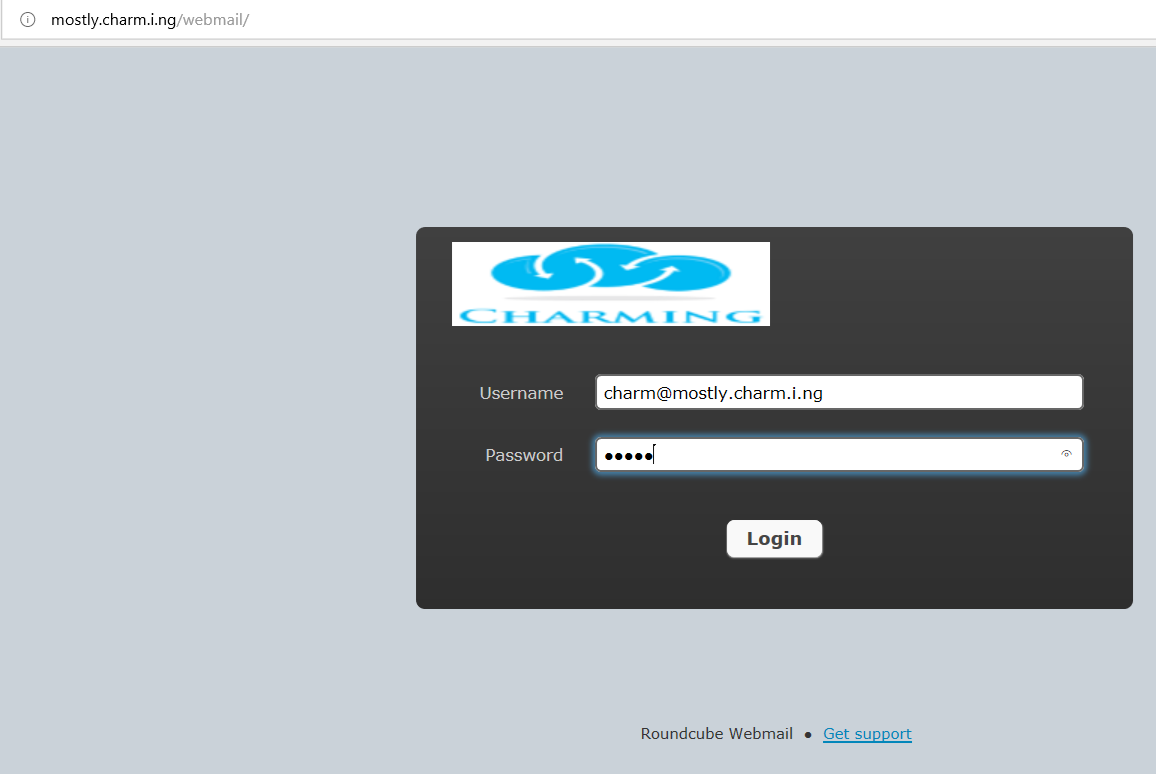
Each user needs to setup their personal info in roundcube. Select Setting — Identities — and the email address. Then fill in the details. A signature is great to be taken serious in life.

Amazon often blocks sending mail from EC2 servers, you should request that AWS permit you to use SES, then setup your SMTP mail client to use SES. To get started with SES go to SES in your AWS panel.
The Floating Cloud Server has several features that have been added especially for you, our Floating Cloud clients.
I suggest NOT using this server as SMTP. It isn’t setup to relay. We have found AWS SES service to be the best, To use SES in your client
Use port 587 or 465
IAM and SES will assign you an SMTP username and password
For security try starttls
Send an email to support@floatingcloud.io if you have an issue setting up SES, it can be confusing. We won’t be able to assist in making your Floating Cloud Server do SMTP in a manner that the email won’t be blocked by spam filters.
You can check your email using ROundcube Webmail that is pre-installed in the Floating Cloud Small Business Server.
Goto
http://publicDNS/webmail
Put in the username and password added above.
Each user needs to setup their personal info in roundcube
Amazon often blocks sending mail from EC2 servers, you should request that AWS permit you to use SES, then setup your SMTP mail client to use SES. To get started with SES go to SES in your AWS panel.
To install HmailServer yourself download it from https://www.hmailserver.com/download
RoundCube WebMail requires MySql. It can be installed on any platform that support PHP and MySql. Packaged together in Windows makes things simpler
If you prefer to install Roundcube by yourself download it from https://roundcube.net/download/
You must be logged in to post a comment.